How to use this guide
Cross chain swap fees stack up fast—bridge fees, DEX swap fees, gas, slippage, and even hidden “approval” costs. In my experience auditing hundreds of routes for traders and treasurers, a few systematic tweaks can cut total costs by 15–40% without adding risk. This guide shows you exactly how to find the best route cross chain, reduce slippage in crypto swaps, and keep more of your capital working.
- What you’ll get: 11 field-tested tricks, quick steps, and tools to benchmark routes
- Who it’s for: active users who care about cross chain swap fees and execution quality
- What we’ll avoid: hype, unproven claims, or pushing unsafe bridges
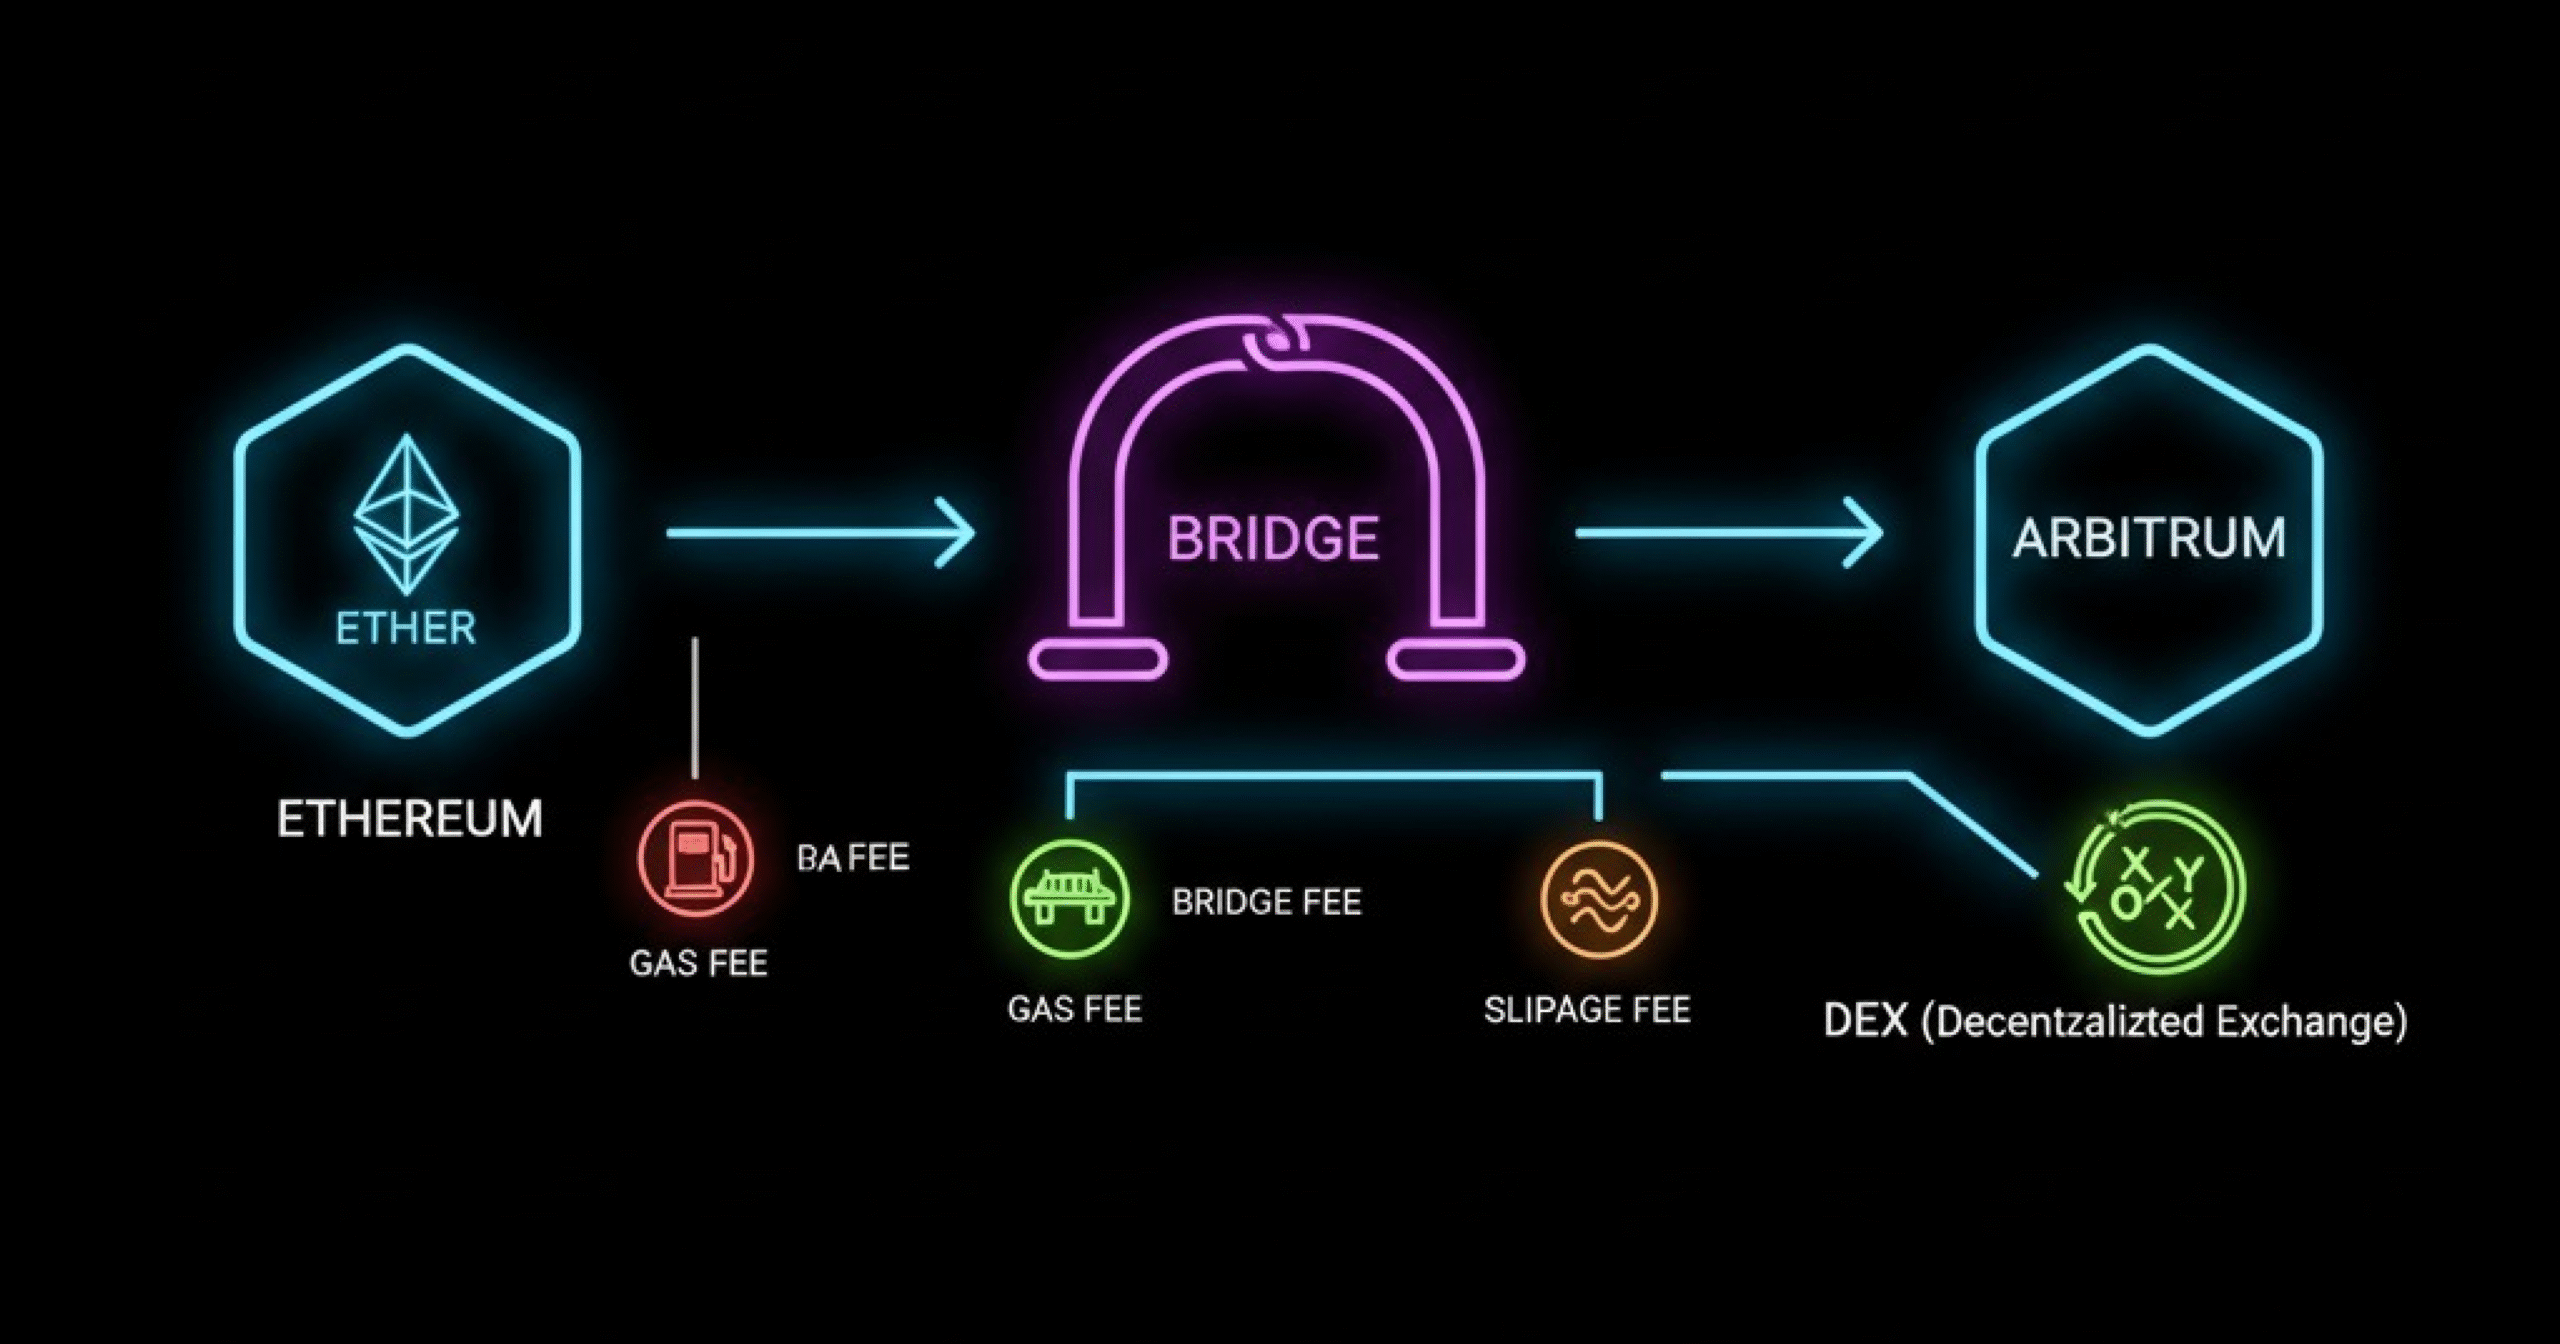
Understand the fee stack before you optimize
If you want to minimize DEX aggregator fees and total costs, break each route into parts:
- Source chain gas: approvals + swap + bridge call
- Bridge fee: protocol toll + relayer/oracle/LP fee (varies by bridge)
- Destination gas: claim + swap (+ approvals if needed)
- Slippage: price impact due to liquidity depth, MEV, and volatility
- Aggregator fee: small service fee on some routes
- Hidden frictions: reverts, minimums, wrong network, or unsupported tokens
External references:
- Etherscan Gas Tracker: https://etherscan.io/gastracker
- L2Fees.info (current fees on L2s): https://l2fees.info/
- DeFiLlama Bridges and Liquidity: https://defillama.com/
The 11 tricks to slash cross chain swap fees
1) Bridge the stable, swap the volatile on the destination
Why it works:
- Bridging volatile assets magnifies slippage and MEV exposure. Stablecoins (USDC/USDT) typically enjoy deeper liquidity and the cheapest cross-chain bridge options, so you minimize price impact.
How to do it:
- Swap your volatile token to a major stable on the source chain.
- Bridge the stable to the destination.
- Swap into the target volatile token on the destination DEX with deepest liquidity.
When to avoid:
- If the destination token has extremely thin liquidity; simulate both ways (volatile→stable→volatile vs volatile direct) and compare.
2) Compare at least two bridge families per corridor
Why it works:
- Pricing varies by design: canonical bridges, liquidity networks (e.g., Across, Stargate, Synapse), and AMM bridges can differ by several dollars, especially under load.
How to do it:
- Get quotes from 2–3 options per corridor (e.g., Ethereum→Arbitrum): canonical bridge + a fast liquidity bridge.
- Compare total cost: bridge fee + gas + expected slippage (if combined with a swap).
Authoritative sources:
- Across docs: https://docs.across.to/
- Hop Protocol: https://docs.hop.exchange/
- Stargate: https://stargate.finance/
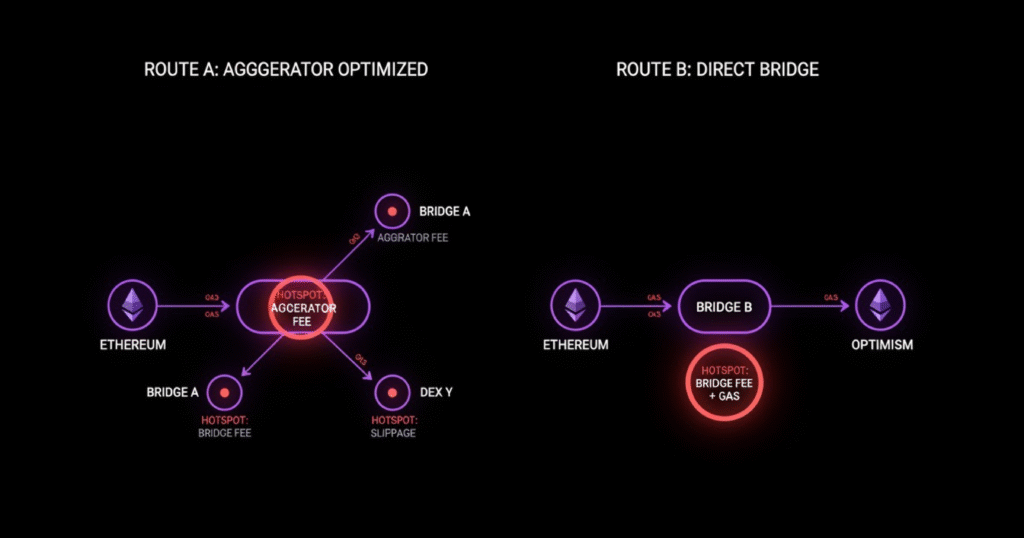
3) Use an aggregator that does cross‑chain smart order routing
Why it works:
- Aggregators that combine bridges + DEX routes (LI.FI, Socket/Bungee, Odos, 1inch, 0x) can stitch multi-hop, multi-DEX paths with better pricing and MEV-aware routing. Some show DEX aggregator fees upfront.
How to do it:
- Fetch quotes from at least two aggregators and compare the full route (not just the headline price).
- Prefer routes with MEV protection options and expected price impact shown.
References:
- LI.FI docs: https://docs.li.fi/
- Odos: https://docs.odos.xyz/
- 1inch: https://docs.1inch.io/
- 0x: https://0x.org/docs
- Socket (Bungee): https://docs.socket.tech/
4) Turn on MEV protection and private orderflow
Why it works:
- MEV (sandwiches, front-running) inflates slippage and can cause reverts. Private relays reduce public mempool exposure and help you reduce slippage in crypto swaps.
How to do it:
- Use RPCs or tools like MEV-Blocker or Flashbots Protect.
- Choose aggregators that offer protected fills or native integrations.
References:
- MEV-Blocker: https://www.mevblocker.io/
- Flashbots Protect: https://docs.flashbots.net/flashbots-protect/
5) Batch or eliminate approvals (Permit2, signatures)
Why it works:
- Extra approvals are extra transactions (gas). Permit and Permit2 flows (where supported) can reduce or consolidate approvals.
How to do it:
- Prefer routes that use Permit/Permit2 or batch transactions when possible.
- If you must approve, do it once for commonly used tokens rather than per swap (balance convenience and security).
Reference:
- Uniswap Permit2: https://docs.uniswap.org/contracts/permit2/overview
6) Time your swaps for off‑peak gas windows
Why it works:
- On Ethereum, base fee cycles and daily patterns matter. Off-peak (weekends, late UTC nights) can be materially cheaper. On L2s, timing still helps during bursts.
How to do it:
- Check Etherscan Gas Tracker before initiating the route.
- If the move isn’t time-sensitive, wait for lower base fees or route via an L2 where fees are consistently lower.
External data:
- Etherscan Gas Tracker: https://etherscan.io/gastracker
- L2Fees.info: https://l2fees.info/
7) Bring native gas with you (refuel on the bridge)
Why it works:
- Landing on a new chain without native gas forces a separate purchase or bridge, adding fees and delays. Some bridges/aggregators let you send a small amount of the destination gas token in the same transaction.
How to do it:
- Use “refuel” features to send a few dollars worth of native gas (e.g., ARB, OP, MATIC) together with your bridge.
- If your tool doesn’t support it, add a tiny separate bridge of native gas first.
Tip:
- Socket/Bungee “Refuel” is a popular option: https://docs.socket.tech/introduction/refuel
8) Simulate slippage on real liquidity, not guesses
Why it works:
- Slippage comes from pool depth and volatility. Two pools with identical fee tiers can have very different depth. Always check depth at your size.
How to do it:
- Preview routes and inspect price impact in bps.
- On-chain, check pool reserves or use DeFiLlama and DEX analytics to estimate price impact.
References:
- DeFiLlama Pools & DEX volumes: https://defillama.com/
9) Keep an eye on DEX aggregator fees and minimums
Why it works:
- Some aggregators charge small fees on certain chains or sizes. On tiny transfers, that fee might dominate; on large ones, slippage dominates. Pick the tool that’s cheapest for your size.
How to do it:
- Compare all-in quotes from 2–3 aggregators, focusing on the “minimum received” amount.
- For small sizes, try a native DEX if aggregator fee outweighs routing benefits.
Keywords to include: DEX aggregator fees, best route cross-chain
10) Use a CEX-as-bridge fallback for certain corridors
Why it works:
- For some corridors (e.g., ERC20→TRC20 stablecoins), a reputable CEX can be cheaper/faster than a bridge—especially if you already hold balance there. Withdrawal fees can be flat and predictable.
How to do it (compliant use only):
- Deposit the asset, convert networks/tokens internally, and withdraw to the destination network.
- Check the exchange’s withdrawal fee page and network support before moving.
Caveats:
- KYC, withdrawal limits, maintenance downtime, and counterparty risk. Only use regulated, reputable exchanges and confirm deposit networks.
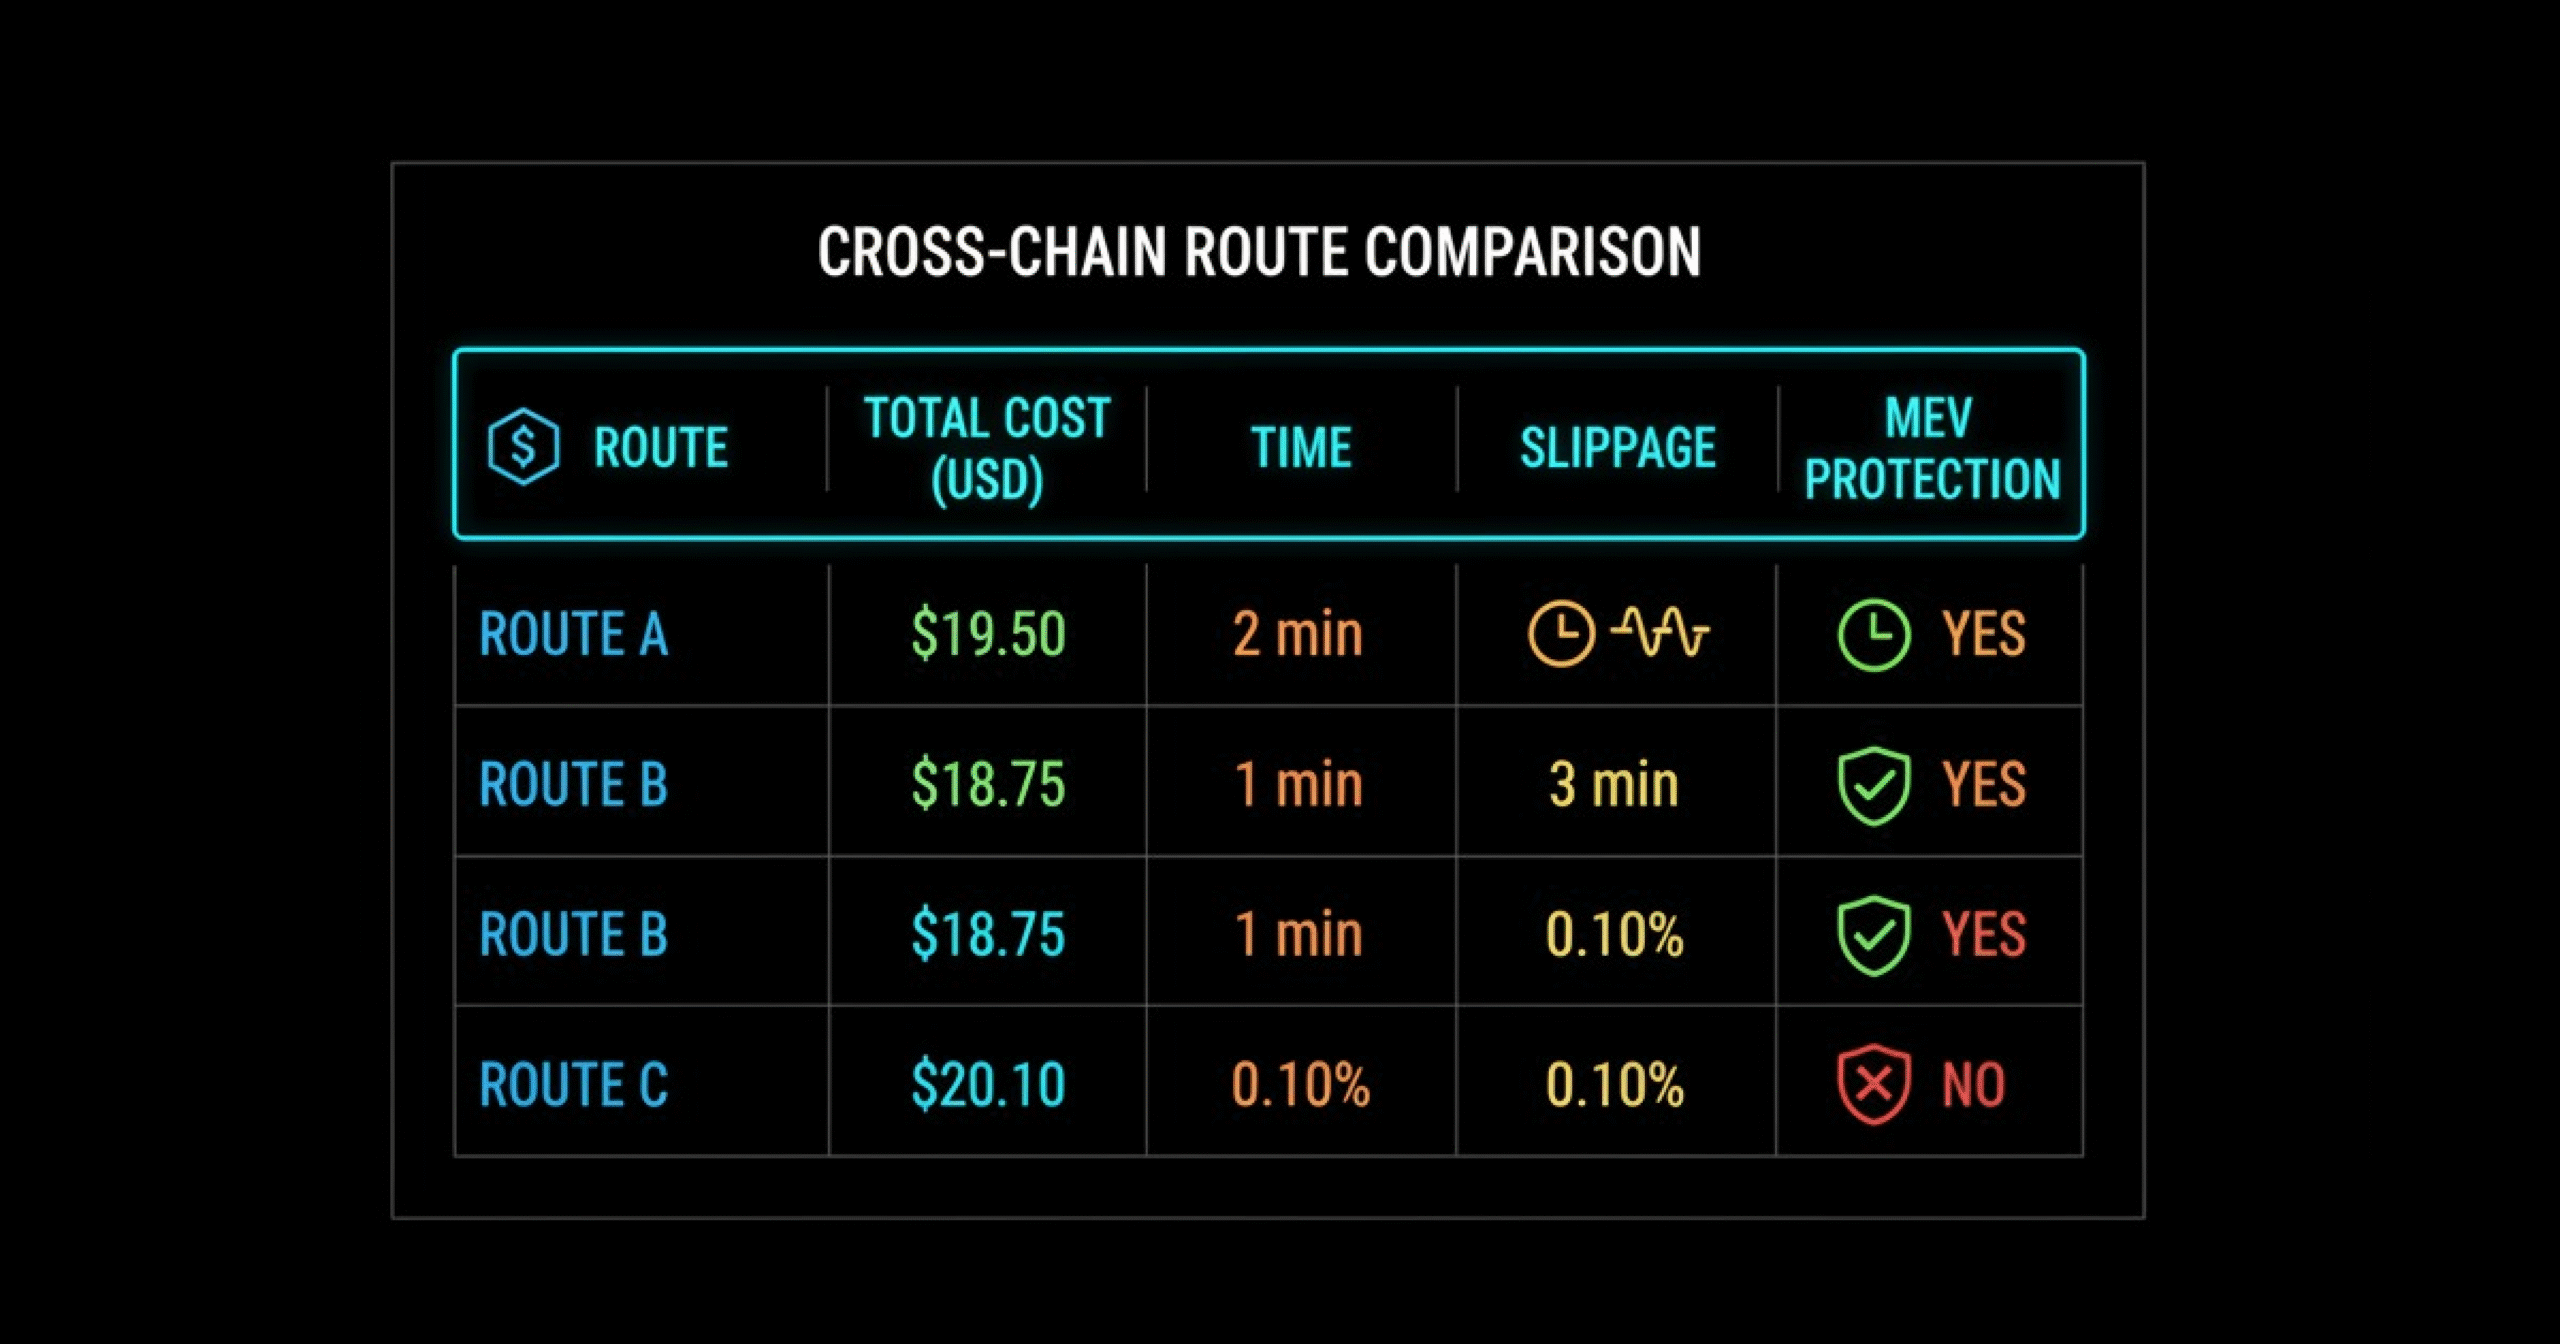
11) Automate your route benchmarking
Why it works:
- Professionals don’t guess; they compare. Consistent benchmarking finds 10–40% savings over time.
How to do it:
- For recurring flows, log quotes from 2–3 aggregators and 2–3 bridges at the same time of day for a week. Pick consistent winners per corridor.
- Track: all-in cost (including gas), “minimum received,” execution time, and failure rate.
What “good” looks like:
- A route that is consistently among the top-2 cheapest with low failure/revert rates and protected orderflow.
Worked examples: How to compare routes the right way
These are example frameworks—always verify live data.
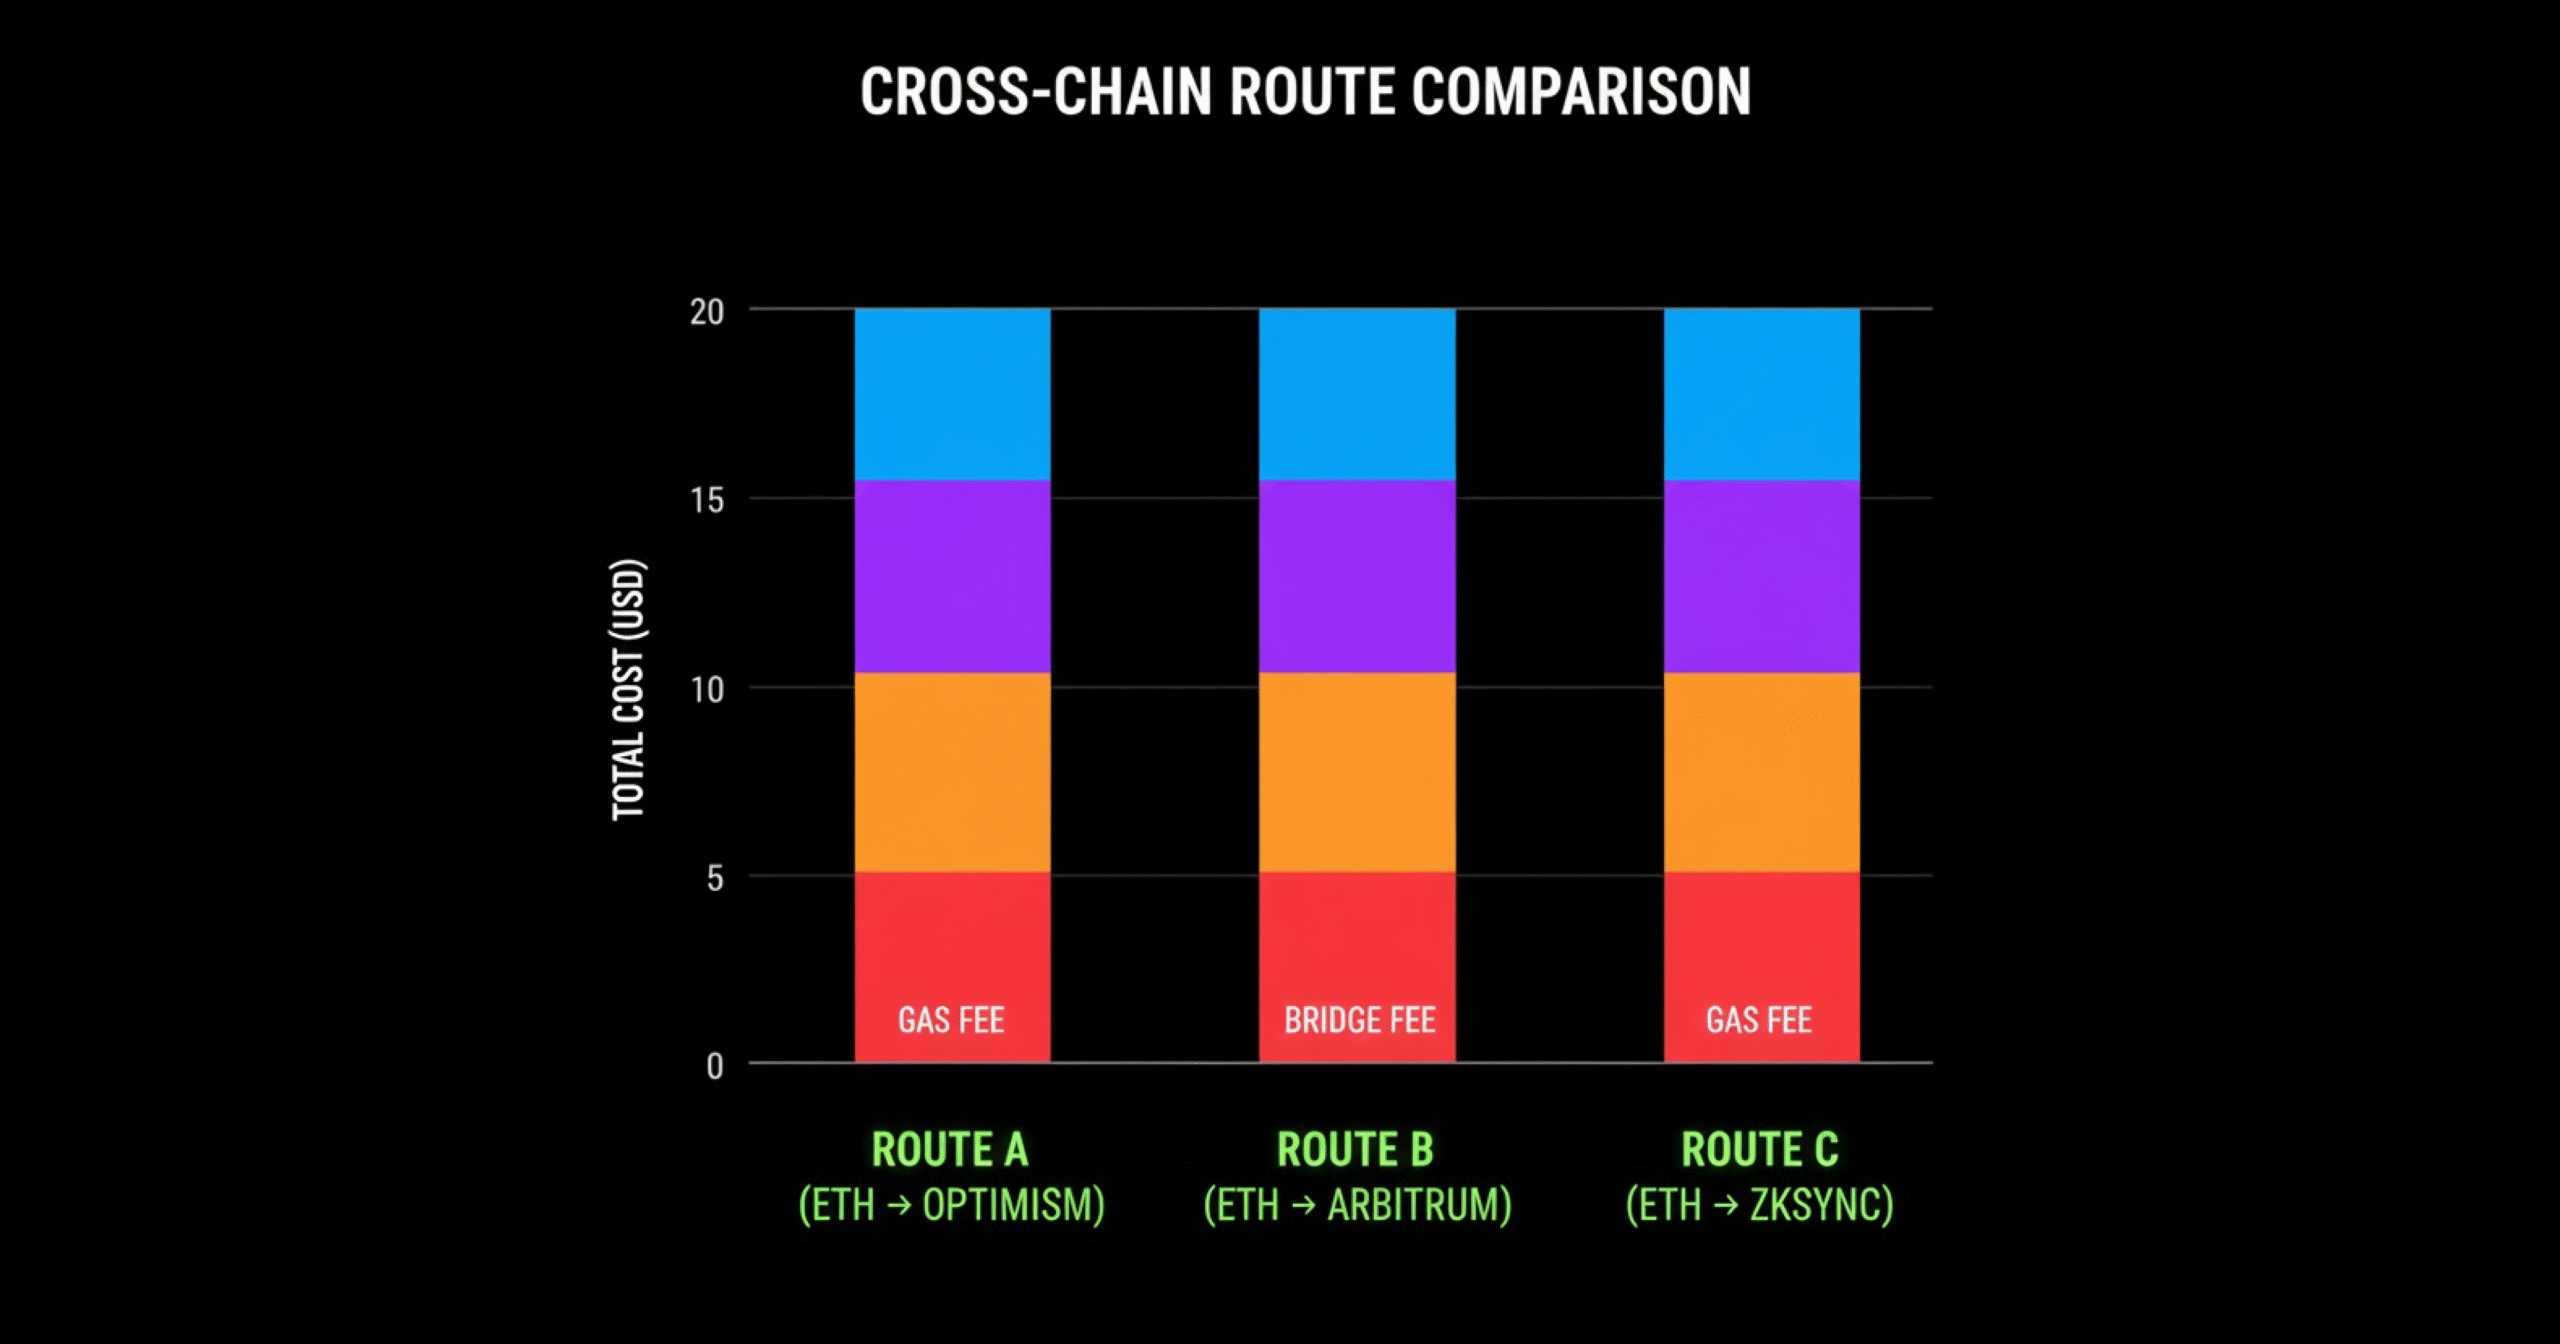
Example A: ETH (Ethereum) → USDC (Arbitrum)
- Option 1: Swap ETH→USDC on Ethereum, then bridge USDC → Arbitrum, then refuel a bit of ARB gas
- Option 2: Bridge ETH→Arbitrum, then swap ETH→USDC on Arbitrum
- Option 3: Use a cross-chain aggregator that bundles the optimal combination
How to evaluate:
- Check gas now vs later (Etherscan Gas Tracker).
- Compare bridge fees (Across, Hop, canonical Arbitrum bridge).
- Simulate slippage on both chains (pool depth on the target DEX).
- Pick the path with the best “minimum received” after all costs.
What often wins:
- Option 2 or 3 during high L1 gas (swap on Arbitrum where gas and slippage are usually lower). Option 1 can win when L1 gas is unusually cheap and USDC liquidity is abundant.
Example B: SOL (Solana) → OP (Optimism)
- Option 1: SOL→USDC (Solana), bridge USDC→Optimism, USDC→OP on Optimism
- Option 2: SOL→WETH (Solana if available), bridge to Optimism, WETH→OP
- Option 3: Aggregator route (e.g., LI.FI/Odos/Bungee) combining best bridge + DEX
Checklist:
- Is the bridge native to Solana and Optimism? Are there trusted liquidity bridges?
- Does the aggregator show MEV protection and slippage estimates?
- Do you arrive with OPTIMISM gas in the same flow?
Common mistakes that quietly drain PnL
- Bridging the volatile token instead of a stable (extra slippage).
- Forgetting destination gas (paying for a separate gas top-up).
- Setting slippage too tight and paying repeated gas on reverts.
- Ignoring aggregator fees for small sizes.
- Not checking exchange deposit networks (wrong network → stuck funds).
- Skipping MEV protection on volatile or thin pairs.
Tools pros keep open
- Etherscan Gas Tracker (timing): https://etherscan.io/gastracker
- L2Fees.info (relative costs): https://l2fees.info/
- DeFiLlama (liquidity depth/volumes): https://defillama.com/
- Bridges: Across, Hop, Stargate (see docs above)
- Aggregators: LI.FI, Odos, 1inch, 0x, Socket/Bungee (see docs above)
- MEV protection: MEV‑Blocker, Flashbots Protect
Related reading and linking plan
Internal links (Underwork)
- Read our fee‑saver playbook: “Stop Overpaying: 12 Hidden Crypto Withdrawal Fees Exchanges Don’t Advertise” (/blog/exchange-withdrawal-fees/)
- Fix execution quality: “Smarter Than DEXes: How Aggregators Cut Your Swap Costs by 43%” (/blog/dex-aggregator-benchmark/)
- Avoid pitfalls: “12 Costly Stablecoin Swap Mistakes (and the Simple Fixes Pros Use)” (/blog/stablecoin-swap-mistakes/)
- How‑to hub: “Move Crypto from Wallet to Exchange Faster (Without Losing Money)” (/blog/wallet-to-exchange/)
External
- Etherscan Gas Tracker: https://etherscan.io/gastracker
- L2Fees.info: https://l2fees.info/
- DeFiLlama: https://defillama.com/
- Across: https://docs.across.to/
- Hop: https://docs.hop.exchange/
- Stargate: https://stargate.finance/
- LI.FI: https://docs.li.fi/
- Odos: https://docs.odos.xyz/
- 1inch: https://docs.1inch.io/
- 0x: https://0x.org/docs
- Socket/Bungee + Refuel: https://docs.socket.tech/
- MEV‑Blocker: https://www.mevblocker.io/
- Flashbots Protect: https://docs.flashbots.net/flashbots-protect/
FAQ: Cross‑chain fees and routing
Q1: What’s the single biggest lever on cross chain swap fees?
- Usually slippage from shallow liquidity. Bridging a stable and swapping on the destination with deep liquidity often beats other options.
Q2: Are aggregators always cheaper than a single DEX?
- Not always. Aggregators shine on larger sizes and complex routes. For small trades, a native DEX can beat them if DEX aggregator fees apply.
Q3: Is a canonical bridge safer than a liquidity bridge?
- Canonical bridges have different trust models (often more conservative, sometimes slower). Liquidity bridges can be faster and cheaper but add protocol/relayer risk. Check audits, TVL, and incident history.
Q4: How tight should slippage be?
- Depends on pair volatility and depth. For majors with deep liquidity, 0.3–0.5% is common; for thinner or volatile pairs, consider 1%+. Always simulate live.
Conclusion: Put your route on “autopilot savings”
You don’t need exotic tricks—just rigorous comparisons and a few pro habits. Benchmark 2–3 bridges, use cross‑chain smart order routing, protect against MEV, and swap where liquidity is thick. Do that, and it’s realistic to shave 15–40% off your all‑in cost over time.
Ready to see the best route cross‑chain right now? Run a live quote, compare two aggregators side‑by‑side, and lock in the cheapest route for your corridor.
- Try it now: Launch the Route Finder
- What’s your go‑to trick? Share your experience in the comments below!